- 什么是 useReducer
- simple state & action
- complex state & action
- multiple useReducers
- useReducer with useContext
- Fetching Data with useReducer
- useState vs useReducer
- 小结
掌握 React Hooks api 将更好的帮助你在工作中使用,对 React 的掌握更上一层楼。本系列将使用大量实例代码和效果展示,非常易于初学者和复习使用。
截止目前我们已经学习了3个hook api,useState, useEffect, useContext。接下来我们学习下一个 hook api,useReducer。首先我们将讲讲什么是 reducer,以及为什么使用 reducer。研究一下 JavaScript 中的 reducer 是什么,这将有助于理解 react hook 中的 useReducer。好,现在开始吧。
什么是 useReducer
useReducer 是一个用于状态管理的 hook api。是 useState 的替代方案。
那么 useReducer 和 useState 的区别是什么呢?答案是useState 是使用 useReducer 构建的。
那么什么时候使用 useReducer 还是 useState 呢?我们完成本章的学习就能找到答案。
reducer
useState - state
useEffect - side effects
useContext - context API
useReducer - reducers
可以看到 useReducer 一定也与 reducer 有关,接下来看看什么是 reducer。之所以要了解什么是 reducer 是为了你不需要掌握 redux 而学会 useReducer,当然,如果你了解Redux,对本章理解会更容易。下面开始
如果你研究过原生 JavaScript,你会发现有一些内置方法,如 foreach, map, reduce。我们来深入看一下 reduce 方法。在 MDN 上可以看到 Array.prototype.reduce() 的文档,文档中说
reduce() 方法对数组中的每个元素执行一个由您提供的 reducer 函数(升序执行),将其结果汇总为单个返回值。
const array1 = [1, 2, 3, 4];
const reducer = (accumulator, currentValue) => accumulator + currentValue;

// 1 + 2 + 3 + 4
console.log(array1.reduce(reducer));
// expected output: 10

// 5 + 1 + 2 + 3 + 4
console.log(array1.reduce(reducer, 5));
// expected output: 15
需要注意的是:reduce 方法接受2个参数,第一个为 reducer 函数,第二个为初始值(给 reducer 函数使用)。reduce 方法返回函数累计处理的结果。
而 reducer 函数有2个必填入参:
accumulator累计器累计回调的返回值; 它是上一次调用回调时返回的累积值,或 initialValue。currentValue数组中正在处理的元素。
reducer 与 useReducer
reducer 与 useReducer 这两者之间有巨大的相似之处。
| reduce in JavaScript | useReducer in React |
|---|---|
array.reduce(reducer, initialValue) |
useReducer(reducer, initialState) |
singleValue = reducer(accumulator, itemValue) |
newState = reducer(currentState, action) |
| reduce method returns a single value | useReducer returns a pair of values. [newState, dispatch] |
上述表格目前看不懂也没有关系,后续通过例子会详细说明。
在这一小节我们学到了:
useReducer是一个用于状态管理的 hook api。useReducer与 reducer 函数有关useReducer(reducer, initialState)接受2个参数,分别为 reducer 函数 和 初始状态reducer(currentState, action)也是接受2个参数,分别为当前状态和 action,返回一个 new state
simple state & action
在本节,我们来看一个计数器的例子,来学习 simple state & action
- import useReducer api
- 声明 reducer function 和 initialState
- 调用执行 reducer
CounterOne.tsx
import React, { useReducer } from 'react'

const initialState = 0
const reducer = (state: number, action: string) => {
  switch (action) {
    case 'increment':
      return state + 1
    case 'decrement':
      return state - 1
    case 'reset':
      return initialState
    default:
      return state
  }
}

function CounterOne() {
  const [count, dispatch] = useReducer(reducer, initialState)
  return (
    <div>
      <div>Count - {count}</div>
      <button
        onClick={() => dispatch('increment')}
      >Increment</button>
      <button
        onClick={() => dispatch('decrement')}
      >Decrement</button>
      <button
        onClick={() => dispatch('reset')}
      >Reset</button>
    </div>
  )
}

export default CounterOne
App.tsx
import React from 'react'

import './App.css'

import CounterOne from './components/19CounterOne'

const App = () => {
  return (
    <div className="App">
      <CounterOne />
    </div>
  )
}

export default App
页面展示如下:
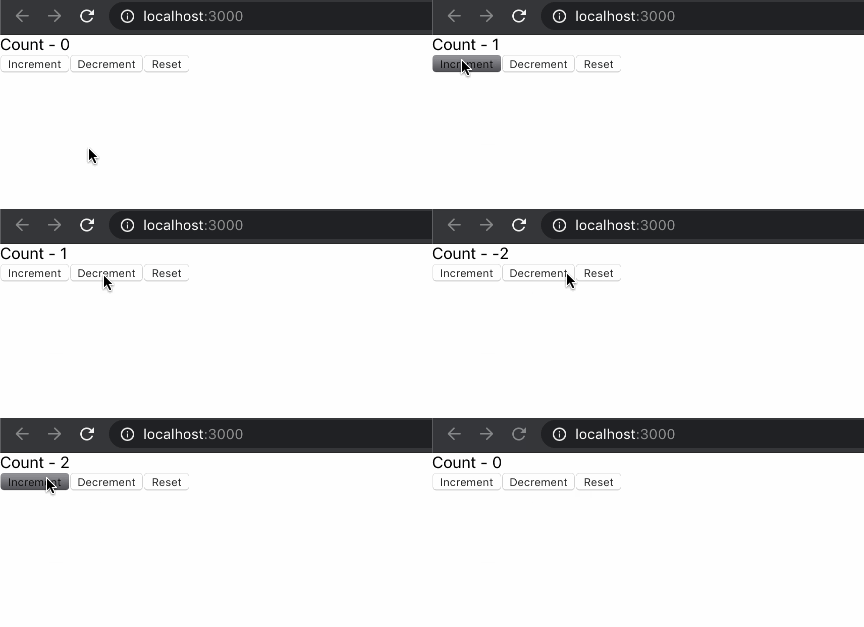
在回顾一下代码,首先 import useReducer
import React, { useReducer } from 'react'
然后调用 useReducer
const [count, dispatch] = useReducer(reducer, initialState)
声明 reducer, initialState
const initialState = 0
const reducer = (state: number, action: string) => {
  switch (action) {
    case 'increment':
      return state + 1
    case 'decrement':
      return state - 1
    case 'reset':
      return initialState
    default:
      return state
  }
}
reducer function 的2个参数,分别为当前 state 和 action, 并根据不同的 action 返回不同的新的 state。
useReducer 返回了一个数组,2个元素分别为 state 和 dispatch 方法。其中 state 在我们的例子中就是当前的 count 值,dispatch 方法接受一个参数,执行对应的 action。dispatch 执行后,对应的 state 会改变,组件会 rerender,来展示最新的状态。
这就是使用 simple state 和 simple action 的例子,本例中 state 是一个 number 类型,action 也是简单的 string 类型,这和 Redux 的模式稍有不同。接下来我们看一个稍复杂的例子。
complex state & action
下面我们看第二个例子。将使用对象作为 state 和 action 的值,这就比较类似 Redux 的模式了。
CounterTwo.tsx
import React, { useReducer } from 'react'

const initialState = {
  firstCounter: 0
}
const reducer = (
  state: {
    firstCounter: number
  },
  action: {
    type: string
  }
) => {
  switch (action.type) {
    case 'increment':
      return {
        firstCounter: state.firstCounter + 1
      }
    case 'decrement':
      return {
        firstCounter: state.firstCounter - 1
      }
    case 'reset':
      return initialState
    default:
      return state
  }
}

function CounterTwo() {
  const [count, dispatch] = useReducer(reducer, initialState)
  return (
    <div>
      <div>Count - {count.firstCounter}</div>
      <button
        onClick={() => dispatch({ type: 'increment' })}
      >Increment</button>
      <button
        onClick={() => dispatch({ type: 'decrement' })}
      >Decrement</button>
      <button
        onClick={() => dispatch({ type: 'reset' })}
      >Reset</button>
    </div>
  )
}

export default CounterTwo
App.tsx
import React from 'react'

import './App.css'

import CounterTwo from './components/20CountTwo'

const App = () => {
  return (
    <div className="App">
      <CounterTwo />
    </div>
  )
}

export default App
页面展示如下:

与上一节的示例效果相同。现在,我们已经将 state 和 action 都改写为对象了,那么这样写有什么好处呢?
其一的好处是 action 现在是一个对象了,可以有多个属性决定 action 的效果。例如我们再添加一个 +5 的逻辑。
CounterTwo.tsx
import React, { useReducer } from 'react'

const initialState = {
  firstCounter: 0
}
const reducer = (
  state: {
    firstCounter: number
  },
  action: {
    type: string
    value: number
  }
) => {
  switch (action.type) {
    case 'increment':
      return {
        firstCounter: state.firstCounter + action.value
      }
    case 'decrement':
      return {
        firstCounter: state.firstCounter - action.value
      }
    case 'reset':
      return initialState
    default:
      return state
  }
}

function CounterTwo() {
  const [count, dispatch] = useReducer(reducer, initialState)
  return (
    <div>
      <div>Count - {count.firstCounter}</div>
      <button
        onClick={() => dispatch({
          type: 'increment',
          value: 1
        })}
      >Increment</button>
      <button
        onClick={() => dispatch({
          type: 'decrement',
          value: 1
        })}
      >Decrement</button>
      <button
        onClick={() => dispatch({
          type: 'increment',
          value: 5
        })}
      >Increment 5</button>
      <button
        onClick={() => dispatch({
          type: 'decrement',
          value: 5
        })}
      >Decrement 5</button>
      <button
        onClick={() => dispatch({ type: 'reset', value: 0})}
      >Reset</button>
    </div>
  )
}

export default CounterTwo
页面展示如下:
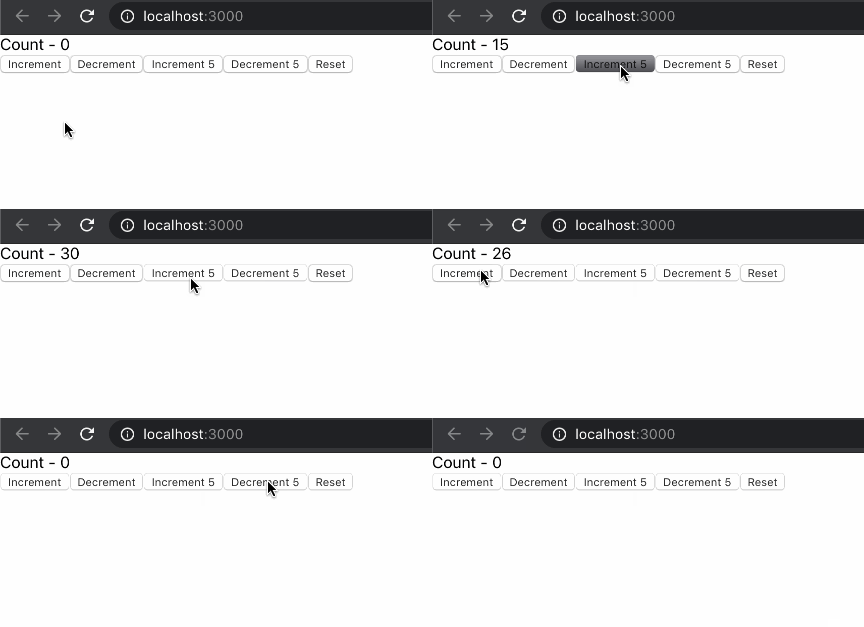
可以注意到给 action 增加了一个 value 属性,实现了加减 5 的逻辑。
第二个好处是 state 作为一个对象,就可以添加更多的 state 属性,例如我们在增加一个计数器2,代码如下:
import React, { useReducer } from 'react'

const initialState = {
  firstCounter: 0,
  secondCounter: 10,
}
const reducer = (
  state: {
    firstCounter: number
    secondCounter: number
  },
  action: {
    type: string
    value: number
  }
) => {
  switch (action.type) {
    case 'increment':
      return {
        ...state,
        firstCounter: state.firstCounter + action.value
      }
    case 'decrement':
      return {
        ...state,
        firstCounter: state.firstCounter - action.value
      }
    case 'increment2':
      return {
        ...state,
        secondCounter: state.secondCounter + action.value
      }
    case 'decrement2':
      return {
        ...state,
        secondCounter: state.secondCounter - action.value
      }
    case 'reset':
      return initialState
    default:
      return state
  }
}

function CounterTwo() {
  const [count, dispatch] = useReducer(reducer, initialState)
  return (
    <div>
      <div>First Count - {count.firstCounter}</div>
      <div>Second Count - {count.secondCounter}</div>
      <button
        onClick={() => dispatch({
          type: 'increment',
          value: 1
        })}
      >Increment</button>
      <button
        onClick={() => dispatch({
          type: 'decrement',
          value: 1
        })}
      >Decrement</button>
      <button
        onClick={() => dispatch({
          type: 'increment',
          value: 5
        })}
      >Increment 5</button>
      <button
        onClick={() => dispatch({
          type: 'decrement',
          value: 5
        })}
      >Decrement 5</button>
      <div>
        <button
          onClick={() => dispatch({
            type: 'increment2',
            value: 1
          })}
        >Increment second</button>
        <button
          onClick={() => dispatch({
            type: 'decrement2',
            value: 1
          })}
        >Decrement second</button>
      </div>
      <button
        onClick={() => dispatch({ type: 'reset', value: 0 })}
      >Reset</button>
    </div>
  )
}

export default CounterTwo
页面展示效果如下
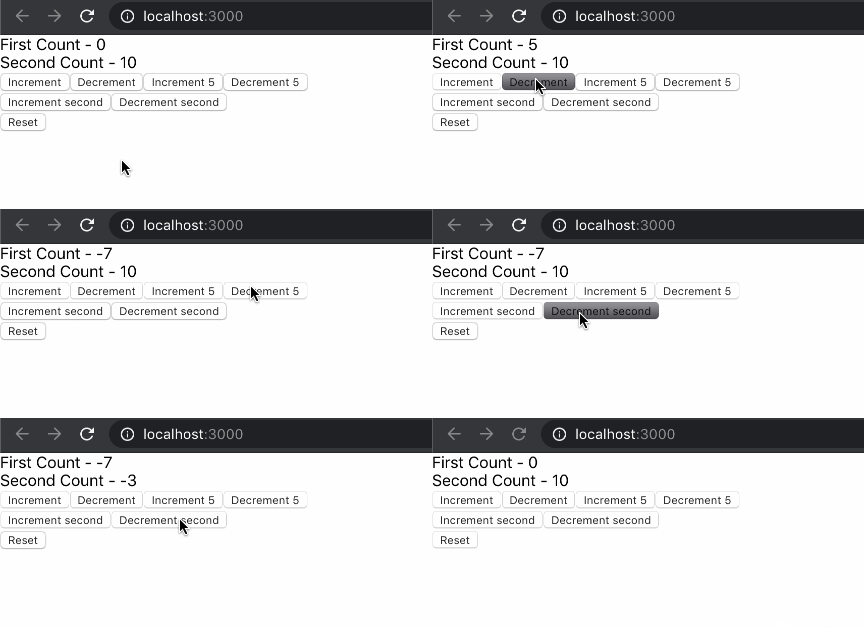
这样我们就能同时维护 2 个计时器。
multiple useReducers
如果有多个 state,但 state 变化的方式又是相同的时候,可以多次使用 useReducer。
CounterThree.tsx
import React, { useReducer } from 'react'

const initialState = 0
const reducer = (state: number, action: string) => {
  switch (action) {
    case 'increment':
      return state + 1
    case 'decrement':
      return state - 1
    case 'reset':
      return initialState
    default:
      return state
  }
}

function CounterThree() {
  const [count, dispatch] = useReducer(reducer, initialState)
  const [countTwo, dispatchTwo] = useReducer(reducer, initialState)
  return (
    <div>
      <div>Count - {count}</div>
      <button
        onClick={() => dispatch('increment')}
      >Increment</button>
      <button
        onClick={() => dispatch('decrement')}
      >Decrement</button>
      <button
        onClick={() => dispatch('reset')}
      >Reset</button>

      <br/>

      <div>CountTwo - {countTwo}</div>
      <button
        onClick={() => dispatchTwo('increment')}
      >Increment</button>
      <button
        onClick={() => dispatchTwo('decrement')}
      >Decrement</button>
      <button
        onClick={() => dispatchTwo('reset')}
      >Reset</button>
    </div>
  )
}

export default CounterThree
页面展示如下
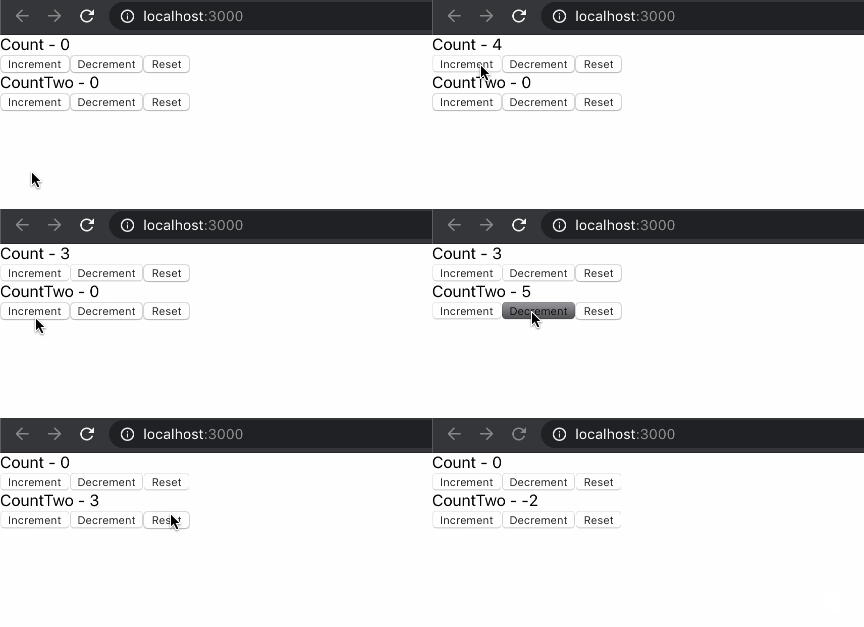
这个例子中使用了多个 useReducer,但共用了一个 reducer function。这有效的避免了合并对象的麻烦(可以对比上一节使用展开运算法合并 state)。也提高了代码的复用性。
useReducer with useContext
截止目前我们已经学习了在组件内使用 useReducer 进行状态管理。如果在某些场景想再组件之间分享 state,进行全局的 state 管理时,我们可以使用 useReducer 加 useContext。
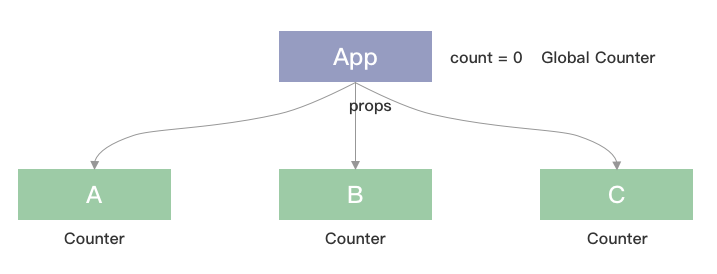
考虑这样一个场景,有3个子组件A, B, C,要在子组件内控制同一个计数器,常规的写法是将 counter 的方法写到父组件上,然后通过 props 的方式将 counter 方法和 state 传给子组件,子组件中调用通过 props 传入的 counter 方法,就会改变父组件中的 state,同时也能改变作为 props 传递给子组件的 app 中的 state。如下图:
看起来没什么问题,但是如果组件嵌套比较深的时候,这将非常糟糕,要一层一层将 counter 方法作为 props 传递给子组件。这时就要使用 useContext 加 useReducer 了。
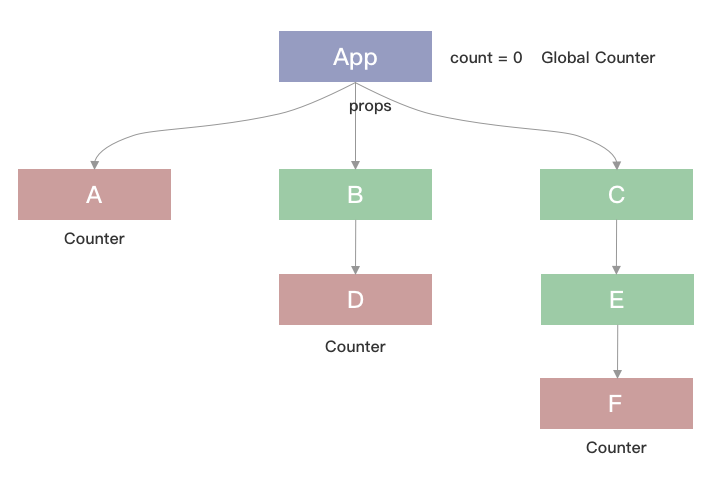
要完成这个需求分为 2 步
- 使用 useReducer 在根节点创建一个 counter 方法
- 通过 useContext 为子组件提供和消费 context
App.tsx
import React, { useReducer } from 'react'
import './App.css'
import A from './components/22A'
import B from './components/22B'
import C from './components/22C'

interface CountContextType {
  countState: number
  countDispatch: (action: string) => void
}

export const CountContext = React.createContext({} as CountContextType)

const initialState = 0
const reducer = (state: number, action: string) => {
  switch (action) {
    case 'increment':
      return state + 1
    case 'decrement':
      return state - 1
    case 'reset':
      return initialState
    default:
      return state
  }
}

const App = () => {
  const [count, dispatch] = useReducer(reducer, initialState)
  return (
    <CountContext.Provider
      value={{
        countState: count,
        countDispatch: dispatch,
      }}
    >
      <div className="App">
        Count - {count}
        <A />
        <B />
        <C />
      </div>
    </CountContext.Provider>
  )
}

export default App
A.tsx
import React, { useContext } from 'react'
import { CountContext } from '../App'

function A() {
  const countContext = useContext(CountContext)
  return (
    <div>
      A - {countContext.countState}
      <button
        onClick={() => countContext.countDispatch('increment')}
      >Increment</button>
      <button
        onClick={() => countContext.countDispatch('decrement')}
      >Decrement</button>
      <button
        onClick={() => countContext.countDispatch('reset')}
      >Reset</button>
    </div>
  )
}

export default A
B.tsx
import React from 'react'
import D from './22D'

function B() {
  return (
    <div>
      <D />
    </div>
  )
}

export default B
C.tsx
import React from 'react'
import E from './22E'

function C() {
  return (
    <div>
      <E />
    </div>
  )
}

export default C
D.tsx
import React, { useContext } from 'react'
import { CountContext } from '../App'

function D() {
  const countContext = useContext(CountContext)
  return (
    <div>
      D - {countContext.countState}
      <button
        onClick={() => countContext.countDispatch('increment')}
      >Increment</button>
      <button
        onClick={() => countContext.countDispatch('decrement')}
      >Decrement</button>
      <button
        onClick={() => countContext.countDispatch('reset')}
      >Reset</button>
    </div>
  )
}

export default D
E.tsx
import React from 'react'

import F from './22F'

function E() {
  return (
    <div>
      <F />
    </div>
  )
}

export default E
F.tsx
import React, { useContext } from 'react'
import { CountContext } from '../App'

function F() {
  const countContext = useContext(CountContext)
  return (
    <div>
      F - {countContext.countState}
      <button
        onClick={() => countContext.countDispatch('increment')}
      >Increment</button>
      <button
        onClick={() => countContext.countDispatch('decrement')}
      >Decrement</button>
      <button
        onClick={() => countContext.countDispatch('reset')}
      >Reset</button>
    </div>
  )
}

export default F
页面效果如下
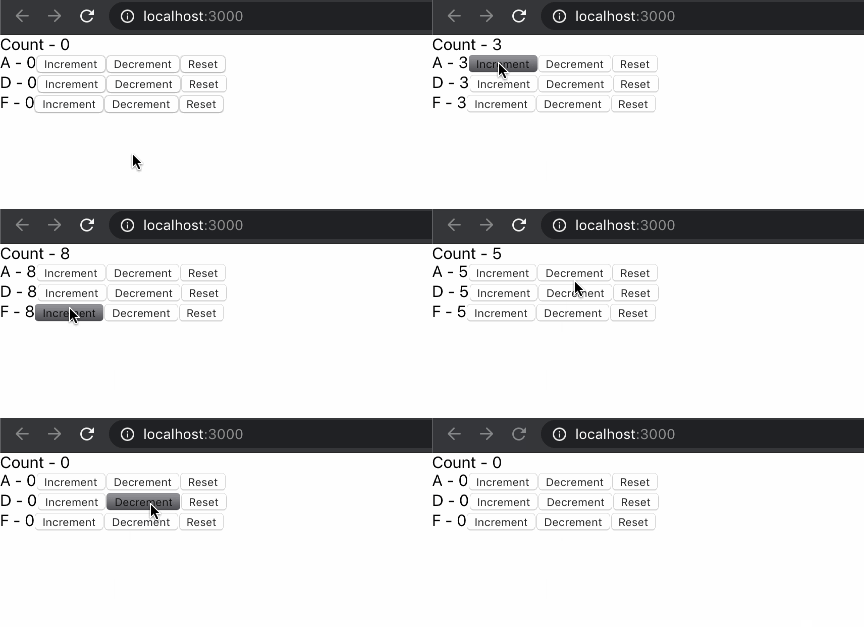
我们再一起回顾一下
- 在 App.tsx 中,我们使用 useReducer 创建了一个 counter,声明了初始值,创建了 reducer 函数,useReducer 返回了状态 count 和 dispatch 方法。
- 为了能让其他组件访问到 count 和 dispatch,我们通过 React.createContext 创建了 CountContext,并用
<CountContext.Provider>包裹根节点。将 count 和 dispatch 作为 value 传给 Provider。 - 在子节点中,我们使用 useContext 获取到 count 和 dispatch 方法,通过调用 dispatch 实现对 count 的改变。
Fetching Data with useReducer
之前我们已经在 useEffect 的章节中学习掌握了如何请求数据,当时是使用了 useEffect 和 useState,现在我们再来看看如何使用 useReducer 去请求远程数据。
接下来我们做这样一个小需求:
- 页面载入时请求数据
- 请求数据中展示 loading 状态
- 请求返回后移除 loading 样式,展示请求的数据;若请求失败,也移除 loading 展示错误提示
我们将分别使用 useState 和 useReducer 来实现,并对比其中的区别。
useState 实现请求
App.tsx
import React from 'react'
import './App.css'

import DataFetchingOne from './components/23DataFetchingOne'

const App = () => {
  return (
    <div className="App">
      <DataFetchingOne />
    </div>
  )
}

export default App
DataFetchingOne.tsx
import React, { useState, useEffect } from 'react'
import axios from 'axios'

interface postType {
  userId: number
  id: number
  title: string
  body: string
}

function DataFetchingOne() {
  const [loading, setLoading] = useState(true)
  const [error, setError] = useState('')
  const [post, setPost] = useState({} as postType)

  useEffect(() => {
    axios.get('https://jsonplaceholder.typicode.com/posts/1').then((res) => {
      setLoading(false)
      setPost(res.data)
      setError('')
    }).catch(() => {
      setLoading(false)
      setPost({} as postType)
      setError('something went wrong')
    })
  }, [])

  return (
    <div>
      {
        loading
          ? 'Loading...'
          : post.title
      }
      {
        error
          ? error
          : null
      }
    </div>
  )
}

export default DataFetchingOne
页面效果如下
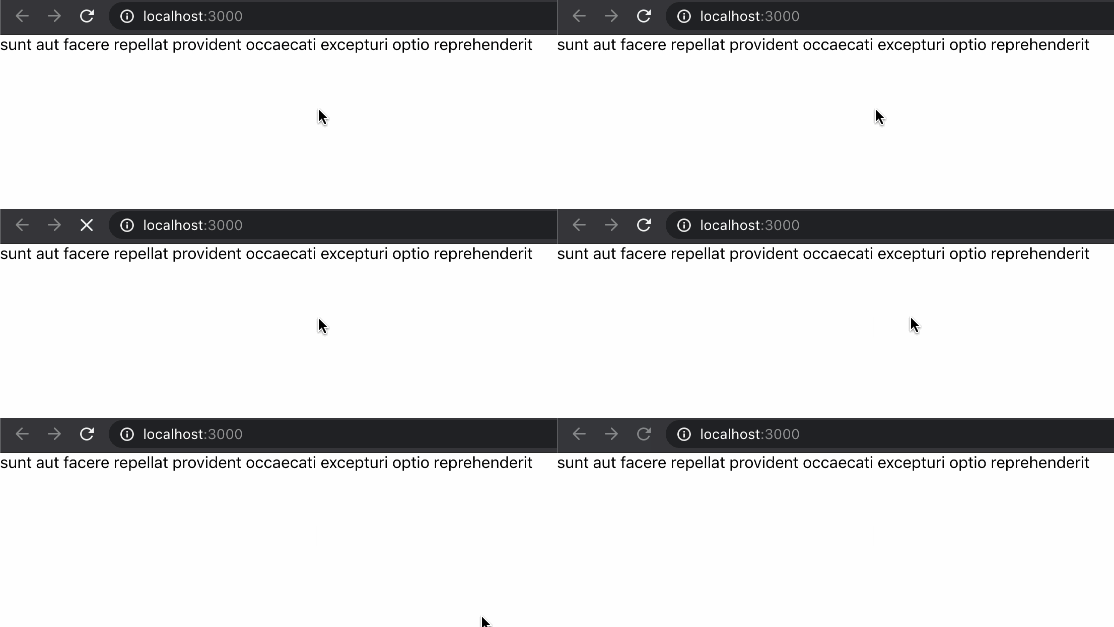
我们故意改错一个 axios 请求的链接,可以看到如下进入错误的逻辑。

注意到在这个实现中,我们使用了3个useState去控制 loading, post 和 error,接下来看看如何使用 useReducer 实现。
useReducer 实现请求
App.tsx
import React from 'react'
import './App.css'

import DataFetchingOne from './components/23DataFetchingOne'

const App = () => {
  return (
    <div className="App">
      <DataFetchingOne />
    </div>
  )
}

export default App
import React, { useEffect, useReducer } from 'react'
import axios from 'axios'

interface postType {
  userId: number
  id: number
  title: string
  body: string
}

type stateType = {
  loading: boolean
  error: string
  post?: postType | {}
}

type actionType = {
  type: 'FETCH_SUCCESS' | 'FETCH_ERROR'
  payload?: postType | {}
}

const initialState = {
  loading: true,
  error: '',
  post: {},
}

const reducer = (state: stateType, action: actionType) => {
  switch (action.type) {
    case 'FETCH_SUCCESS':
      return {
        loading: false,
        error: '',
        post: action.payload,
      }
    case 'FETCH_ERROR':
      return {
        loading: false,
        error: 'something went wrong',
        post: {},
      }
    default:
      return state
  }
}

function DataFetchingTwo() {
  const [state, dispatch] = useReducer(reducer, initialState)

  useEffect(() => {
    axios.get('https://jsonplaceholder.typicode.com/posts/1').then((res) => {
      dispatch({
        type: 'FETCH_SUCCESS',
        payload: res.data,
      })
    }).catch(() => {
      dispatch({
        type: 'FETCH_ERROR'
      })
    })
  }, [])

  return (
    <div>
      {
        state.loading
          ? 'Loading...'
          // @ts-ignore
          : state.post.title
      }
      {
        state.error
          ? state.error
          : null
      }
    </div>
  )
}

export default DataFetchingTwo
页面展示效果与上一个例子相同

可以看到,我们将 state 集合在了一起,在同一个对象,修改 state 的逻辑也聚合在了一起,即 reducer 函数中的 switch 部分。
至此你可能会好奇,什么时候该用 useState 什么时候该用 useReducer,我们继续往下看。
useState vs useReducer
- 如果 state 的类型为 Number, String, Boolean 建议使用 useState,如果 state 的类型 为 Object 或 Array,建议使用 useReducer
- 如果 state 变化非常多,也是建议使用 useReducer,集中管理 state 变化,便于维护
- 如果 state 关联变化,建议使用 useReducer
- 业务逻辑如果很复杂,也建议使用 useReducer
- 如果 state 只想用在 组件内部,建议使用 useState,如果想维护全局 state 建议使用 useReducer
| Scenario | useState | useReducer |
|---|---|---|
| Type of state | Number, String, Boolean | Object or Array |
| Number of state transitions | 1 or 2 | Too many |
| Related state transitions | No | Yes |
| Business logic | No business logic | Complex business logic |
| local vs global | local | global |
小结
本章主要讲述了 useReducer 的使用方法。从 JavaScript 中的 reduce api 开始,对比说明了什么是 useReducer。
学习了 useReducer 的简单状态的使用,复杂状态的使用,以及多个 useReducer 的使用。
掌握了组件嵌套多层时使用 useContext 加 useReducer 完成子组件修改全局state的方法,代码更优雅,可维护性更高。
通过对比 useState,学习了如何使用 useEffect 加 useReducer 请求数据,并控制 loading 状态的显示隐藏。
最后对比了 useState 和 useReducer,并给出了使用建议。